Water-resistant RFID reader with Bluetooth, long-range scanning,
ideal for aggressive animals, cages, and fish farms.
Power Supply
Rechargeable Lithium/Ion Battery (included)
Temperature range
-10ºC to 60ºC
Dimensions L x W x H:
L 60cm x W 6cm x Thickness 3.5cm
Weight
approx. 470 g
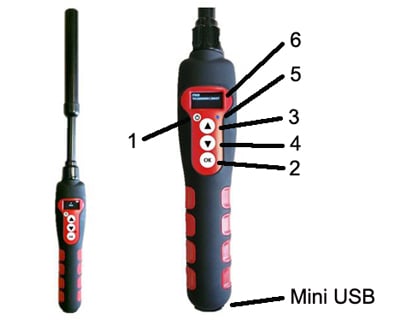
The reader has four buttons:
- One round button to switch the device on/off
- Three central buttons
The upper button (3) and middle button (4) (scroll up and scroll down) are used to scroll the various functions of the reader on the display.
The lower “OK” button (Validate or Enter) (2) is used to validate the options selected by the user when navigating through the various menus.
At the bottom of the device you will see a mini- USB type connector used for:
• Recharging the reader via a USB cable.
• Transferring any data stored by the reader.
• An OLED display comprising four lines of 16 characters.
After switching on the reader by pressing the On/Off button (1), you will see the message “Scan” with an arrow above it.
Press three times on the upper button (3) to display the “Language” menu. Then validate by pressing button (2). The reader is initially configured to operate in English.
To change the language, press button (4) and scroll down the languages until the one you wish to use (for example Spanish) is displayed. You must then validate your choice (button 2).
The following message is displayed for 4 seconds:
English
OK
And then the reader displays:
Scan
The languages available are: English, French, Spanish, Italian, Portuguese, Deutsch and Polish.
Once you have selected the language by pressing “ok” (2) you can switch off the reader by holding down the “On/Off” button (1).
When the reader is switched off, you can switch it on by pressing button “On/Off” button (1). The display shows:SCAN
Press the “Validate” button (2) to activate chip search for 20 seconds.
Reading
The operator must hold the reader close to the place where the chip is assumed to be, scanning over the area slowly.
Two cases may arise:
A transponder is detected. The reader emits a “beep” and displays the identification number in the following form:
FDXB
952000001010101
In this case the transponder is an ISO FDX B. type transponder.
The identification number takes the form of a series of 15 digits (FDX B) or 10 digits (FDX A).
The number remains displayed for one minute before the reader switches back to the Scan Screen.
Note: switching off the reader causes the number displayed to be erased from the memory.
No transponder is detected.
If no transponder has been detected after 20 seconds, the reader emits three “beeps” and displays:
No transponder found!
This message will be erased after approximately 20 seconds. The reader will then display:
Scan
It will switch itself off automatically after two minutes to save battery power.
In this case, it is recommended to make two or more attempts to read the chip, scanning more widely over the area in which it is assume to be implanted. Each successive pressing of the button (4) will restart the reading in accordance with the process described above.
• The reader is powered by a Lithium/ion battery.
• This battery is designed to allow several thousand reading operations. It can be recharged by connecting the reader to a USB port.
• A fixed red LED (5) indicates that recharging is in progress and green (5) when it is fully loaded.
• This LED will blink in blue when Bluetooth is activated.
• The service life of the battery depends not only on its use but also on the environment in which the reader is stored.
• An indicator on the right of the display (6) indicates the battery charge level.
• When the charge is too low the T4A 2416 reader displays the following message:
Low battery
Only around ten more reading operations will be possible before the reader switches itself off permanently.
To replace the battery, it is necessary to open the reader. It is strongly advised to consult your distributor, as it is essential to use original batteries only.
For setup instructions, software guidance, and operating information for the T4A 2416, view the manual below.