T4A 2416
Contact Information:
Box 1149, 109 St Andrew St, Mitchell, Ontario, N0K 1N0
519-348-8491
Fax 519-348-9519
TOLL FREE 1-877-738-4384
sales@tags4all.net |
|
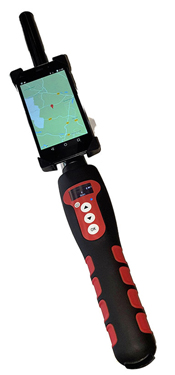
| T4A 2416- Tags4All Electronic RFID Reader |
| The T4A 2416 is waterproof up to the display and has a water resistant body. This reader is able read and send microchip numbers directly to your android device via Bluetooth. The length of the RFID reader allows for an increased distance at which microchips can be read. Its design is perfect for reading aggressive dogs, caged animals through the bars, or for use on fish farms. |
T4A 2416 Specifications
T4A 2416 – Electronic RFID Reader
Advantages of Tags4All Inc. 2416 Electronic RFID Reader
• The T4A 2416 Electronic Reader is waterproof up to the display and has a water resistant body, excellent for use at fish farms.
• The Reader’s memory is able to store 800 numbers.
• Able to connect to any Android device using Bluetooth function, where additional information can be recorded.
• All recorded data can be exported into an excel file for easy review.
• Its length allows for an increased distance at which microchips can be read.
• Able to read ISO FDX B, FDX A, Ear Tags, HDX & EM4102 type RFID tags.
• In compliance with ISO norms 11784 / 11785 & 14223 |
Technical Data Tags4All 2416 Electronic RFID Reader
Frequency
134.2kHz – Read & Write
Reading Range
FDX B: 14-15cm
FDX A: 9-11cm
Ear Tags: 28-30cm (depends on provider)
Display
LED Black and White Display
4 Lines of 16 Characters
Interfaces
USB Port with Software
Bluetooth – Compatible with Android Devices
Power Supply
Rechargeable Lithium/Ion Battery (included)
Temperature range
-10ºC to 60ºC
Dimensions L x W x H:
L 60cm x W 6cm x Thickness 3.5cm
Weight
approx. 470 g |
T4A 2416 Electronic RFID Reader – Elementary User Manual
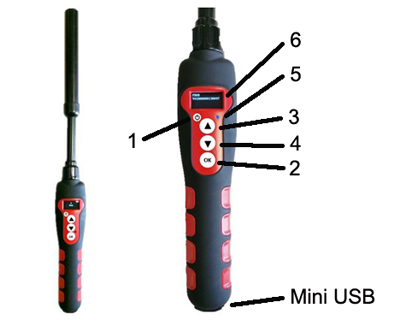 |
Description of T4A 2416 Reader
The reader has four buttons:
- One round button to switch the device on/off
- Three central buttons
The upper button (3) and middle button (4) (scroll up and scroll down) are used to scroll the various functions of the reader on the display.
The lower “OK” button (Validate or Enter) (2) is used to validate the options selected by the user when navigating through the various menus.
At the bottom of the device you will see a mini- USB type connector used for:
•
Recharging the reader via a USB cable.
•
Transferring any data stored by the reader.
• An OLED display comprising four lines of 16 characters.
Configuring the Reader
After switching on the reader by pressing the On/Off button (1), you will see the message “Scan” with an arrow above it.
Press three times on the upper button (3) to display the “Language” menu. Then validate by pressing button (2). The reader is initially configured to operate in English.
To change the language, press button (4) and scroll down the languages until the one you wish to use (for example Spanish) is displayed. You must then validate your choice (button 2).
The following message is displayed for 4 seconds:
English
OK
And then the reader displays:
Scan
The languages available are: English, French, Spanish, Italian, Portuguese, Deutsch and Polish.
Once you have selected the language by pressing “ok” (2) you can switch off the reader by holding down the “On/Off” button (1).
Activating the Reader
When the reader is switched off, you can switch it on by pressing button “On/Off” button (1). The display shows:SCAN
Press the “Validate” button (2) to activate chip search for 20 seconds.
Reading
The operator must hold the reader close to the place where the chip is assumed to be, scanning over the area slowly.
Two cases may arise:
First case:
A transponder is detected. The reader emits a “beep” and displays the identification number in the following form:
FDXB
952000001010101
In this case the transponder is an ISO FDX B. type transponder.
The identification number takes the form of a series of 15 digits (FDX B) or 10 digits (FDX A).
The number remains displayed for one minute before the reader switches back to the Scan Screen.
Note: switching off the reader causes the number displayed to be erased from the memory.
Second case:
No transponder is detected.
If no transponder has been detected after 20 seconds, the reader emits three “beeps” and displays:
No transponder found!
This message will be erased after approximately 20 seconds. The reader will then display:
Scan
It will switch itself off automatically after two minutes to save battery power.
In this case, it is recommended to make two or more attempts to read the chip, scanning more widely over the area in which it is assume to be implanted. Each successive pressing of the button (4) will restart the reading in accordance with the process described above.
Recharging the Battery
• The reader is powered by a Lithium/ion battery.
•
This battery is designed to allow several thousand reading operations. It can be recharged by connecting the reader to a USB port.
• A fixed red LED (5) indicates that recharging is in progress and green (5) when it is fully loaded.
•
This LED will blink in blue when Bluetooth is activated.
• The service life of the battery depends not only on its use but also on the environment in which the reader is stored.
• An indicator on the right of the display (6) indicates the battery charge level.
•
When the charge is too low the T4A 2416 reader displays the following message:
Low battery
Only around ten more reading operations will be possible before the reader switches itself off permanently.
To replace the battery, it is necessary to open the reader. It is strongly advised to consult your distributor, as it is essential to use original batteries only. |
|